Такие операции, как MS Exchange синхронизация, импорт и стаббинг сообщений требуют полного доступа для чтения ко всем почтовым ящикам, находящимся в Microsoft Exchange. Чтобы его предоставить, необходимо создать учетную запись в Microsoft Exchange с правами на чтение во всех почтовых ящиках.
Шаги по настройке имперсонализации Exchange зависят от конкретной используемой версии Microsoft Exchange:
Microsoft Exchange 2003
Архива интегрируется в Microsoft Exchange 2003 с использованием WebDav API. Необходимо проверить, что WebDav установлен и настроен так, как это описано ниже:
- Установите и включите компонент WebDav IIS
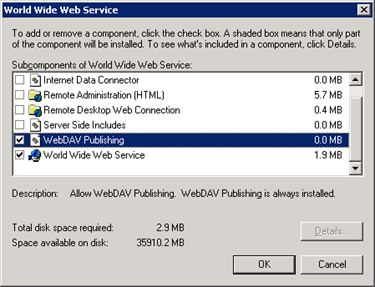
В Панели задач выберите пункт Программы и компоненты, кликните Server -> Internet Information Services -> World Wide Web Service -> WebDAV Publishing и убедитесь, что WebDav Publishing установлена.
Как только компонент WebDav установлен, убедитесь, что он разрешен в IIS Manager (англ. allowed).

2. Предоставьте пользователю полные права на почтовый ящик.
Архива требуется учетная запись с достаточными правами на чтение всех почтовых ящиков Microsoft Exchange.
a) Создайте новый почтовый ящик с названием “journal” в Microsoft Exchange или используйте уже существующий, но не имеющий выделенных прав Администратора.
б) На сервере, где запущен Microsoft Exchange 2003, запустите Exchange System Manager.
в) Откройте объект сервера (англ. server object) в необходимой Административной группе (англ. Administrative Group). Расширьте объект сервера. Расширьте соответствующую 'Storage Group'. Укажите требуемое хранилище почтового ящика, кликните правой кнопкой и выберите опцию "Свойства" (англ. 'Properties').

г) В "Свойствах" кликните по вкладке "Безопасность" (англ. 'Security').
д) Кликните "Добавить" (англ. 'Add') и затем кликните по учетной записи Active Directory - 'OK'.
е) Убедитесь, что почтовый ящик ‘journal’ выбран в поле "Имя" (англ. 'Name').
ж) В списке Прав (англ. 'Permissions'), кликните Разрешить (англ. 'Allow') рядом с 'Full Control' и затем нажмите 'OK'.

з) Для завершения нажмите 'Ok'.
Microsoft Exchange 2007
- Авторизуйтесь в сервер Exchange 2007 как Администратор
- Или создайте новый почтовый ящик под названием ‘journal’ в Microsoft Exchange или используйте уже существующий, но без выделенных прав Администратора.
- Запустите оболочку Exchange Management
- В оболочке Exchange Management введите следующее:
To prevent Microsoft Exchange from throttling Архива requests:
Microsoft Exchange 2010
To ensure that the Client Access Role is assigned to the Microsoft Exchange server:
- Click Start, click Control Panel, click Programs, and then click Programs and Features.
- Click Microsoft Exchange Server 2010, and then click Change.
- On the User Account Control page, click Continue.
- In the Exchange Maintenance Mode dialog box, click Next.
- In Server Role Selection, if the Client Access Role check box is shaded or selected, the role is installed. Otherwise, it is not installed.
- Click Cancel to close the wizard
To create the impersonation account:
- Login to Exchange 2010 server as Administrator
- Create a new mailbox called ‘journal’ in Microsoft Exchange or use an existing one that does not already have any Admin privileges assigned.
- Open the Exchange Management Shell
- Run the New-ManagementRoleAssignment cmdlet
To enable the ‘journal’ account to access all mailboxes, enter the following command:
To prevent Microsoft Exchange from throttling Архива requests:
Microsoft Exchange 2013
MailArchiva integrates with Microsoft Exchange 2013 via the web services API.
- Login to Exchange 2013 Control Panel as Administrator
- Create a new mailbox called ‘journal’ in Microsoft Exchange or use an existing one that does not already have any Admin privileges assigned.
- Open the Exchange Management Shell
- Run the New-ManagementRoleAssignment cmdlet
To enable the ‘journal’ account to access all mailboxes, enter the following command:
To prevent Microsoft Exchange from throttling Архива requests: