...
- Install and Enable WebDav IIS Component
...
- Grant A User Full Mailbox Rights
Архива requires an account with sufficient privileges to read from all mailboxes in Microsoft Exchange.
a) Create a new mailbox called “journal” in Microsoft Exchange or use an existing one that does not already have any Admin privileges assigned.
b) On the server running Microsoft Exchange 2003, Start 'Exchange System Manager'.
c) Open the server object within the appropriate Administrative Group. Expand the server object. Expand the appropriate 'Storage Group'. Locate the required mailbox store, right-click and choose the 'Properties' option.
d) On the 'Properties' window click the 'Security' tab.
e) Click 'Add' and then click on the Active Directory service account click 'OK'.
f) Ensure that the ‘journal’ account is selected in the 'Name' box.
g) On the 'Permissions' list, click 'Allow' next to 'Full Control' and then click 'OK'.
h) Click 'Ok' to finish
Архива использует WebDav API при импорте сообщений Microsoft Exchange 2003its. Необходимо убедиться, что WebDav установлен и разрешен. Для настройки WebDAV необходимо выполнить следующие шаги:
- Установить и настроить компонент WebDAV сервиса IIS
Из «Добавить/удалить программы» в «Панели управления», нажмите Server | Internet Information Services | World Wide Web Service | WebDAV Publishing, и убедитесь, что WebDAV Publishing установлен.

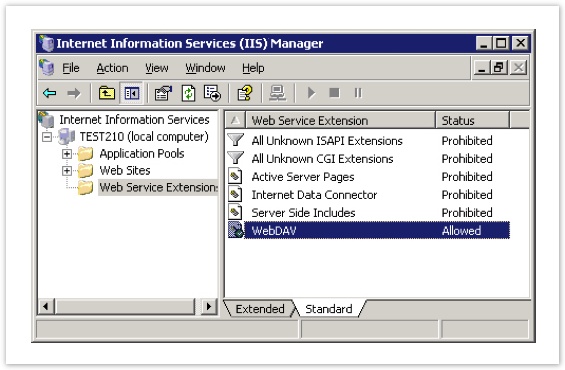
- Убедитесь, что WebDAV разрешен в IIS
- Назначьте учетной записи полный доступ к базе Exchange
- Включите 'Exchange System Manager'
Выберите 'Storage Group' и на хранилище нажмите правую кнопку мыши, выберите опцию 'Properties'
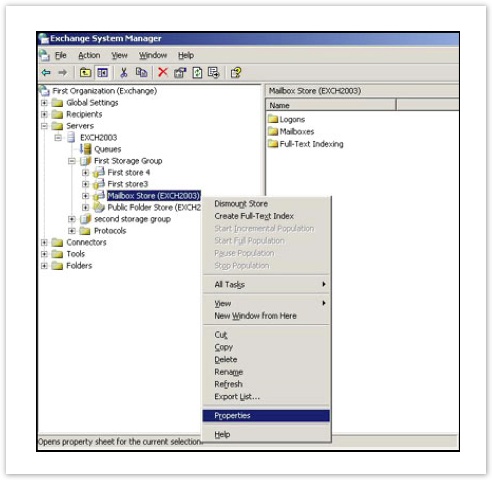
- В окне 'Properties' нажмите вкладку 'Security'
Нажмите 'Add' и добавьте учетную запись, которую вы указали для авторизации Active Directory и нажмите 'OK'
- Укажите 'Full Control' в 'Permissions' list и нажмите 'OK
